A good compost bin is one of those garden tools that quietly changes everything. Instead of hauling away vegetable peels, coffee grounds, and fallen leaves, you turn them into the dark, crumbly material your beds and containers have been asking for. This guide to backyard compost bins will help you choose a setup that fits your space, build a pile that actually breaks down, and avoid the soggy, smelly mess that discourages so many first-time composters.
Composting does not need to be perfect. Your bin is simply a small ecosystem of microbes, moisture, air, and organic material. Give those ingredients a reasonably balanced home, and they will do most of the work for you.
Choose a compost bin that suits your garden
The best bin is the one you will use without dreading it. A large, three-bin system can be wonderful for a big vegetable garden with lots of leaves and plant trimmings. But if you garden in a small backyard or grow mostly in raised beds, a simple enclosed bin may be a much better match.
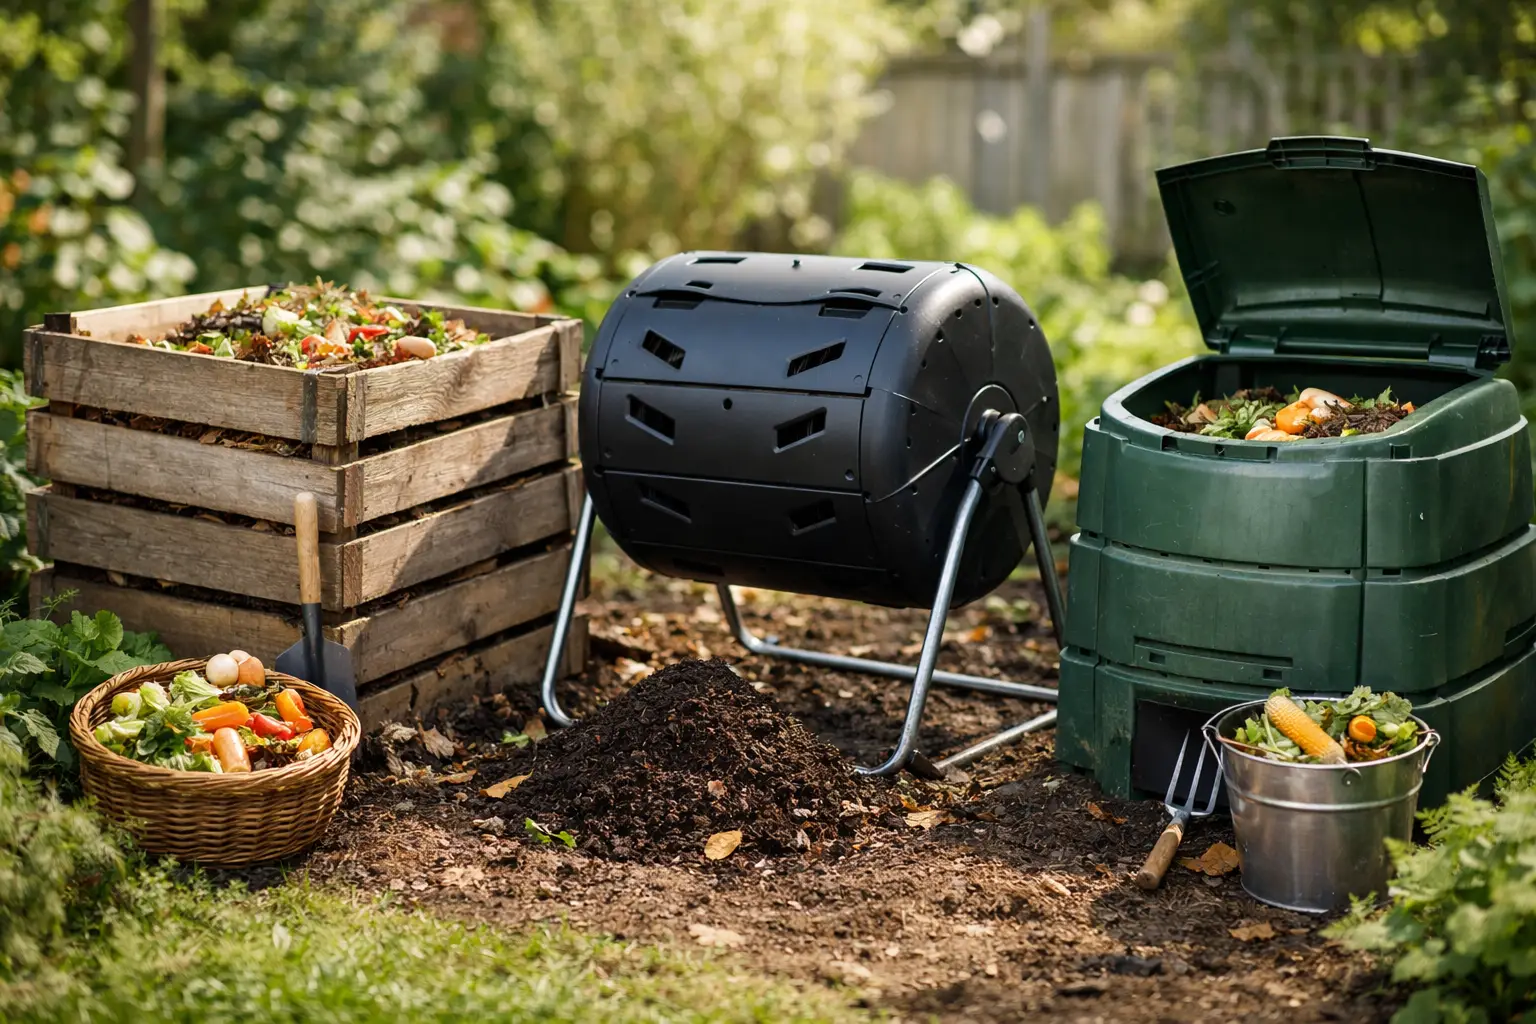
For most home gardeners, there are three practical choices. An open wire or wood bin is inexpensive, easy to fill, and ideal if you have plenty of fall leaves. It also makes turning the pile simple. The trade-off is that it can look a little untidy and may dry out faster in hot weather.
A covered plastic bin keeps the pile neater and can discourage animals from investigating your kitchen scraps. It is a smart choice near patios, fences, or close neighbors. Because the opening is smaller, though, turning the material takes a bit more effort.
A tumbler is tidy and convenient, especially if bending over is difficult. It can produce compost fairly quickly when filled with the right mix, but it has limited capacity and dries out easily. Tumblers are great for light household composting, not for processing a season’s worth of leaves from a large yard.
If you are unsure, start with a basic covered bin or a wire enclosure about 3 feet wide. Composting is easier to stick with when the system feels manageable.
Put the bin in a practical spot
Choose a level, well-drained spot that is easy to reach from both the kitchen and the garden. If walking to the bin feels inconvenient in January or during a summer storm, food scraps are more likely to end up in the trash.
Partial sun is usually ideal. A little warmth helps decomposition, while all-day blazing sun can dry a pile too quickly in many parts of the US. Place the bin directly on soil rather than concrete or a deck when possible. Earthworms and beneficial organisms can move up into the pile, and excess moisture has somewhere to drain.
Avoid placing it right against a wooden fence or your home’s siding. Compost stays damp, and you want enough room to turn it and check for any animal activity. A few feet of breathing room makes maintenance much less awkward.
What goes into a healthy compost pile
Think of compost ingredients in two groups: greens and browns. Greens are nitrogen-rich materials that help feed the microbes. Browns are carbon-rich materials that add structure and keep air moving through the pile.
Kitchen scraps such as fruit and vegetable peels, coffee grounds, tea leaves, crushed eggshells, and stale bread count as greens. Fresh grass clippings, spent annual flowers, and pulled weeds that have not gone to seed also belong in this group.
Dry leaves, shredded paper, untreated sawdust, straw, small twigs, and plain cardboard are browns. Leaves are especially valuable, so it is worth saving a bag or two in fall for use throughout the year.
A simple goal is to add about two to three handfuls of browns for every handful of greens. You do not need to measure. Just get into the habit of covering kitchen scraps with a layer of dry leaves, shredded cardboard, or straw. This one step prevents odors, keeps fruit flies down, and helps the pile stay fluffy.
Keep these materials out of a backyard bin:
- Meat, fish, bones, dairy, oils, and greasy cooked foods
- Pet waste, including cat litter and dog droppings
- Diseased plants or weeds full of mature seeds
- Chemically treated wood, glossy paper, and plastic-coated packaging
Some gardeners compost small amounts of cooked plant-based food successfully, especially in a secure hot pile. For a beginner, it is simpler to stick with raw produce scraps and yard waste. Fewer questionable ingredients means fewer surprises.
How to start your backyard compost bin
Begin with a loose 4- to 6-inch layer of twigs, coarse stems, or dry leaves at the bottom. This creates air space near the soil. Then alternate your greens and browns as you add them, always finishing with a brown layer.
Chop or tear larger materials when you can. A whole corn stalk or thick cabbage stem will eventually break down, but smaller pieces compost much faster. Shredding dry leaves with a mower before adding them is one of the easiest ways to speed up a pile.
Moisture matters as much as the ingredient mix. A healthy pile should feel like a wrung-out sponge: damp when squeezed, but not dripping. If your pile is dusty and barely changing, water it lightly as you turn it. If it is wet, dense, or smells sour, mix in more dry browns and loosen the material with a garden fork.
You do not need to buy a compost activator. A scoop of finished compost or ordinary garden soil can introduce microorganisms, but nature will handle that part on its own. The real activators are enough moisture, enough air, and a useful blend of greens and browns.
The small amount of maintenance that makes a big difference
A compost pile can break down without turning, but it will take longer. Turning introduces oxygen, redistributes damp and dry pockets, and helps the pile heat up when there is enough material. For a faster result, turn it every one to two weeks. For a slower, low-effort approach, turn it once a month or whenever you add a substantial batch of material.
Do not be discouraged if the center never gets hot. Hot composting requires a larger pile and a more precise balance than many backyard bins can maintain. Cool composting is still composting. It simply works at a slower pace, often taking six months to a year instead of a few weeks.
In winter, decomposition slows dramatically in cold climates. Keep adding scraps and browns if there is space, but do not expect much action until spring. Having a lidded container near the back door for temporary scrap storage can make winter composting far less bothersome.
Fix common compost bin problems naturally
A rotten-egg or ammonia smell usually means too many greens, too much water, or not enough air. Mix in dry shredded leaves or cardboard, then turn the pile well. Avoid adding more food scraps until the smell fades.
If the pile is not breaking down, it may be too dry or too small. Add water gradually and include more greens, such as coffee grounds or fresh grass clippings, while keeping a layer of browns on top. A pile that is at least 3 feet wide and tall tends to hold moisture and warmth better than a tiny one.
Fruit flies are annoying but harmless. Bury food scraps in the center of the pile or cover them immediately with several inches of browns. For larger pests, use a bin with a secure lid or line the lower sides with hardware cloth. Never try to solve animal problems by adding chemical deterrents to compost you plan to use around food crops.
Know when your compost is ready
Finished compost is dark brown, loose, and earthy smelling. Most of the original ingredients should be difficult to recognize, though a few twigs or avocado pits may remain. If the material still smells like kitchen scraps or looks like wet leaves, give it more time.
You can sift out larger unfinished pieces and return them to the bin, but sifting is optional. Many gardeners simply use the rougher material as mulch around established shrubs or spread it over empty beds in fall.
For vegetable beds, work 1 to 2 inches of finished compost into the top few inches of soil before planting, or spread it as a surface layer around established plants. In containers, blend it with potting mix rather than filling a pot with pure compost. Compost feeds soil life and improves texture, but it is not a complete substitute for a well-draining growing mix.
A backyard compost bin is not a test you pass or fail. Start with one bucket of scraps, a pile of leaves, and a bin you can reach easily. Before long, the things you once threw away will become part of the soil that grows your next tomato, basil plant, or handful of beans.