A raised bed can save you a lot of gardening heartbreak – but only if you set it up with a little thought before you start filling and planting. If you are wondering how to start raised beds, the good news is that you do not need fancy materials or a perfect backyard. You just need a spot with enough sun, good soil to fill the bed, and a simple plan that matches how you actually garden.
One of the biggest mistakes beginners make is treating a raised bed like a decorative box instead of a growing system. It is easy to get excited about the frame and forget that what really matters is what goes inside it, where it sits, and how easy it will be to care for once summer heat, weeds, and thirsty tomatoes show up.
How to start raised beds with the right location
Before you buy lumber or order soil, stand in your yard and watch the light. Most vegetables want at least 6 to 8 hours of direct sun, and fruiting crops like tomatoes, peppers, squash, and cucumbers usually perform best at the higher end of that range. Leafy greens and herbs can get by with a bit less, especially in hotter parts of the country.
Pick a spot close enough to a water source that you will not dread watering in July. That sounds simple, but it matters more than people expect. A bed tucked into the far corner of the yard may look lovely in spring and feel like a chore by midsummer.
It also helps to choose level ground if you can. A slight slope is workable, but a heavily sloped area can make watering uneven and cause soil to settle to one side over time. If your only sunny area is not perfectly level, you can still build there. Just know you may need a little extra prep to keep the bed stable.
Start with a size you can manage
Bigger is not always better. A common beginner mistake is building beds that are too wide to reach across or too long to keep watered and planted well. For most home gardeners, 4 feet wide is the sweet spot because you can reach the center from either side without stepping in the soil. Length is flexible, but 6 to 8 feet is a comfortable place to start.
Height depends on your soil, your budget, and your body. Beds that are 10 to 12 inches deep work well for many vegetables, especially if roots can grow into the ground below. If you are gardening over compacted soil or want easier access for bending and kneeling, 15 to 18 inches can feel better. Taller beds need more soil, which raises the cost quickly, so there is a trade-off.
If this is your first season, start with one or two beds instead of trying to build a whole backyard farm at once. A small garden that gets consistent care almost always outperforms an oversized one that becomes overwhelming.
Choosing materials for raised beds
There is no single perfect material, and this is one of those areas where it depends on your budget and style. Untreated cedar is a favorite because it lasts well and does not need chemical treatment. Redwood is also durable, though often more expensive. Untreated pine is more affordable but breaks down faster.
Metal raised beds have become popular because they are long-lasting and clean-looking. They can work very well, especially in open spaces. In hotter climates, though, metal can warm the soil faster, which may be helpful in spring but stressful in peak summer if you are growing cool-season crops.
Avoid using old lumber if you do not know its history. Some older treated wood may contain chemicals you do not want near food crops. For an organic garden, it is worth sticking with materials you trust.
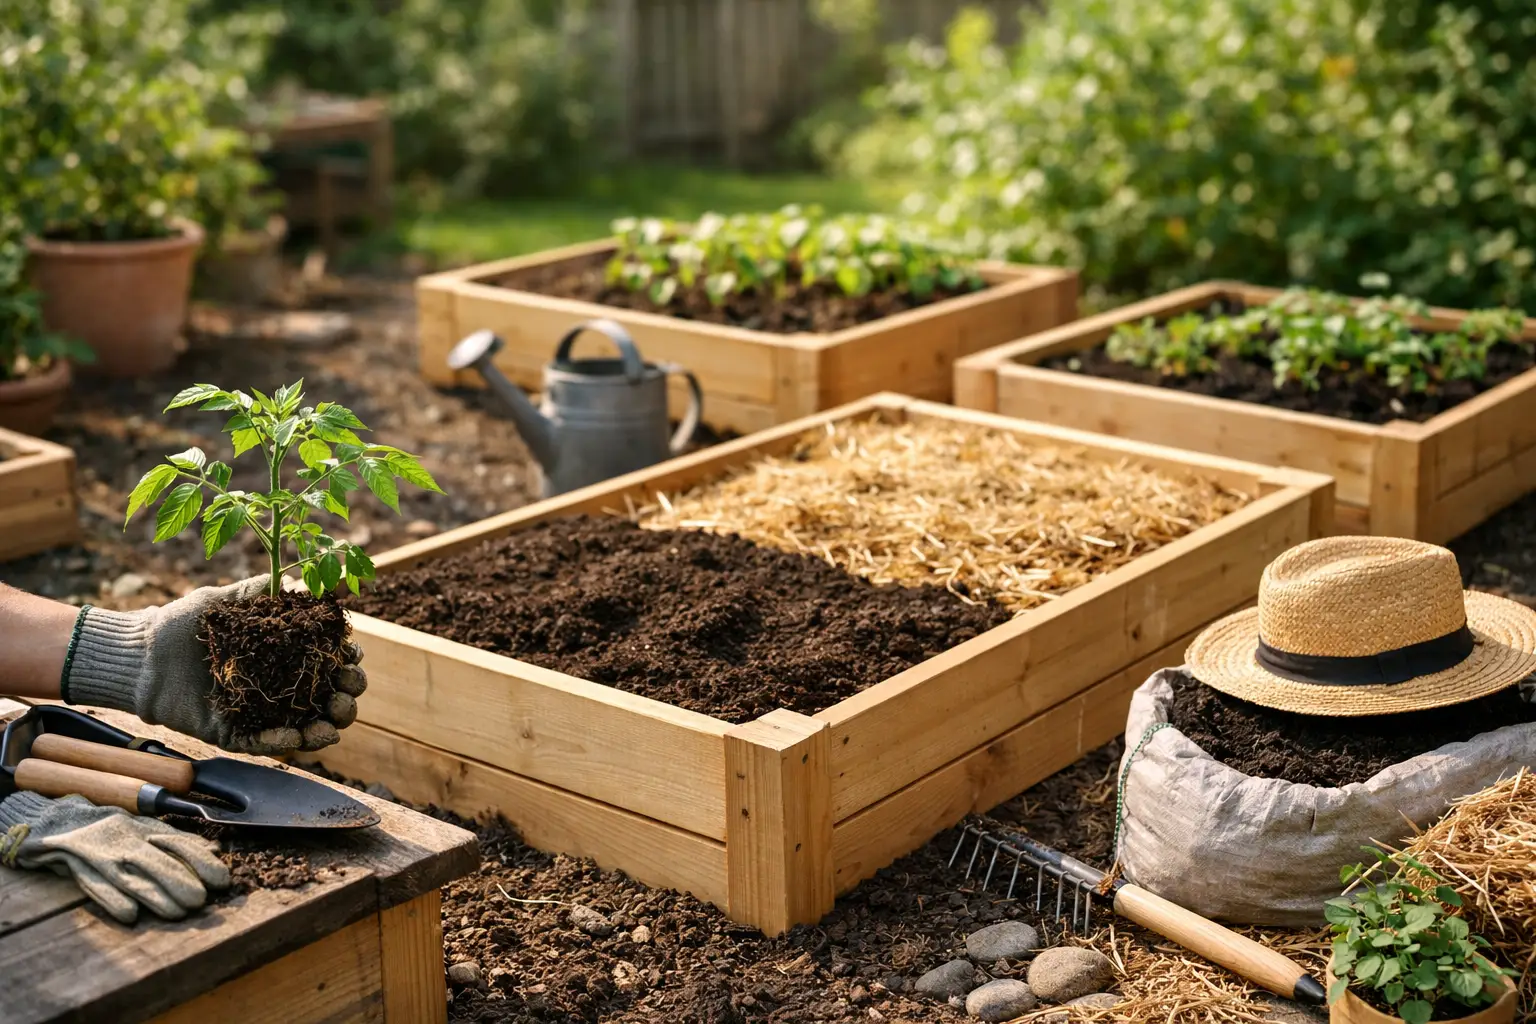
The most important part: filling the bed
If there is one place not to cut corners, it is the soil. Good raised beds are built on good soil, not just boards. Many disappointing gardens come down to beds filled with cheap topsoil that compacts, drains poorly, or contains weed seeds.
A healthy raised bed soil mix should feel loose, drain well, and still hold enough moisture for roots and soil life. A simple approach is to use a blend of quality topsoil, compost, and an aeration material if needed. Compost is what gives your bed life. It improves texture, feeds beneficial microbes, and helps plants grow steadily without depending on synthetic fertilizers.
If you are filling deep beds, you can save money by adding coarse natural material in the bottom portion, such as small branches or partially broken-down yard waste, but only in moderation. You still want most of the root zone filled with real growing soil. Do not fill a vegetable bed mostly with wood scraps and expect easy results the first year.
Before filling, clear out grass and weeds under the bed. You can lay down plain cardboard to smother existing grass, then add your soil mix on top. The cardboard will break down over time and is a practical, low-fuss way to reduce weeds without chemicals.
How to start raised beds for organic growing
Raised beds are a great fit for organic gardening because you control the soil from day one. That makes it easier to skip synthetic fertilizers and focus on building a living soil that improves over time.
Start with compost-rich soil, then plan to top-dress with compost once or twice a year. You may not need much else at first, especially if your mix is good. Heavy feeders like tomatoes, peppers, and squash often appreciate extra organic fertilizer during the season, but it is better to feed based on what you are growing than to apply everything all at once.
Mulch is another simple organic habit that makes a big difference. A light layer of straw, shredded leaves, or untreated grass clippings helps hold moisture, soften temperature swings, and keep soil from splashing onto leaves. It also slows weeds, which means less pulling later.
Watering matters more than most beginners expect
Raised beds drain better than in-ground gardens, which is part of the appeal. But that also means they dry out faster, especially in hot, sunny weather. New gardeners sometimes think raised beds are easier in every way and then get caught off guard when plants wilt in summer.
If possible, set up soaker hoses or drip irrigation early. It does not need to be complicated. Even a simple line snaked through the bed can save time and keep water focused at the roots where plants need it. If you water by hand, do it deeply and consistently rather than giving plants a quick daily sprinkle.
The first few weeks after planting are when you learn your bed. Sandy mixes dry out fast. Compost-heavy mixes may stay moist longer. Wind, heat, plant size, and mulch all change the schedule. A finger in the soil tells you more than the calendar.
What to plant in your first raised bed
Your first season is not the time to plant everything you have ever wanted to grow. Pick a handful of crops you actually eat and that grow well in your season. For many beginners, lettuce, bush beans, basil, peppers, cherry tomatoes, cucumbers, and zucchini are satisfying choices.
Think about plant size before you sow or transplant. A raised bed can look spacious in April and crowded by June. Put tall crops where they will not shade smaller ones, and give sprawling plants room or a trellis. Trellising is especially helpful in raised beds because it keeps fruit cleaner and opens up more growing space.
There is also nothing wrong with mixing vegetables and flowers. Marigolds, calendula, alyssum, and nasturtiums can make a bed more attractive and bring in pollinators. Organic gardening works best when the space feels alive, not sterile.
Common raised bed mistakes to avoid
Most problems are easy to avoid once you know where gardens usually go sideways. Overfilling the bed with poor soil, placing it in too much shade, and planting too close together are the big ones. So is building more than you can realistically water, weed, and harvest.
Another common mistake is assuming raised beds do not need soil improvement after the first year. They do. Soil settles, organic matter breaks down, and nutrients get used. Adding compost regularly keeps the bed productive instead of letting it slowly turn tired and compacted.
And if pests show up, try not to treat that as failure. Raised beds make gardening easier, not magical. You may still deal with aphids, cabbage worms, or squash vine borers. Healthy soil, good spacing, row covers when needed, and regular observation usually go farther than harsh sprays.
Starting raised beds without overcomplicating it
If all of this feels like a lot, keep the first version simple. Build one bed in a sunny spot. Fill it with quality soil and compost. Plant a few reliable crops. Mulch them. Water deeply. Notice what works.
That is really the heart of how to start raised beds. Not perfection. Not expensive gear. Just a manageable setup that gives your plants a strong start and gives you enough success to want to keep going.
A good raised bed gets better with time, and so do the gardeners tending it.